🚀 The "Beginner-to-Pro" Crypto Wallet Guide
Step 1: Get Your Digital Keys
Before you build anything, you need to get your “Security Keys.” Think of this like getting the keys to a brand-new car before you drive it off the lot.
Go to Magic.link and sign up for a free account.
Once you are logged in, look for a button that says “Create New App.”
Give it a name (like “My First Wallet”) and click Create.
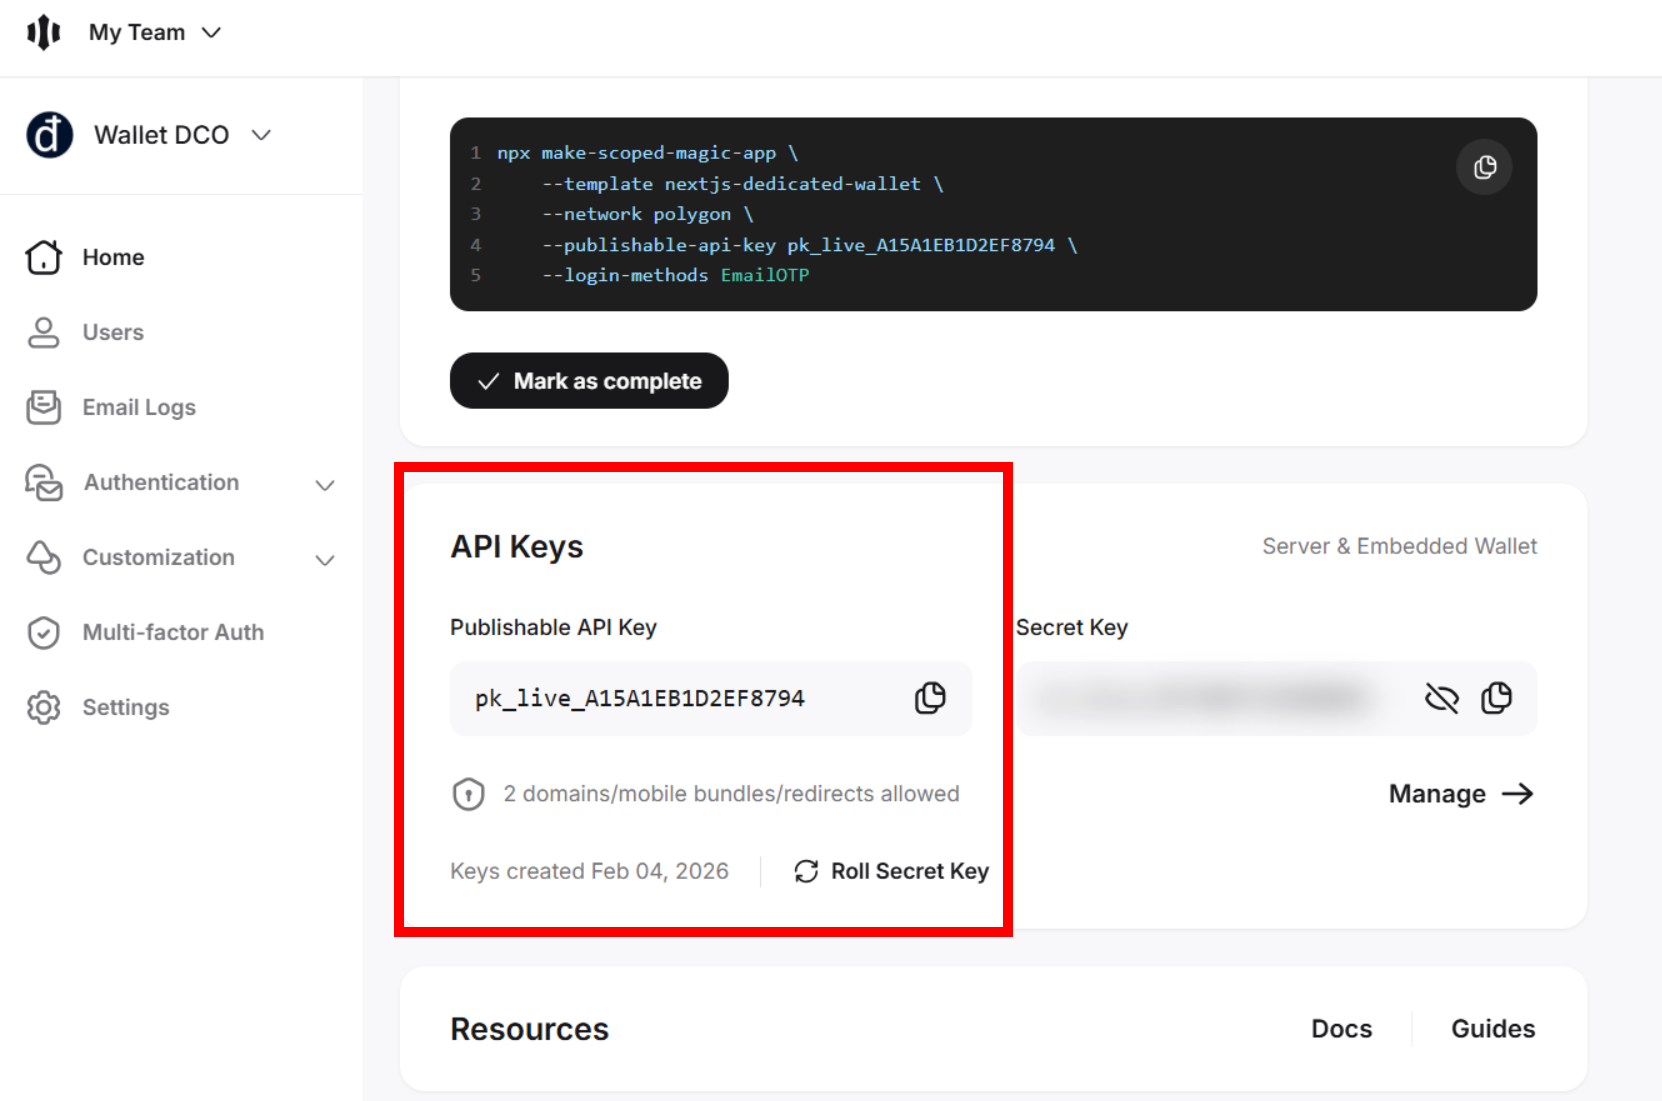
You will see a screen with two long strings of random letters and numbers.
Look for the one that says “Publishable API Key” (It starts with
pk_live).Copy this key and save it in a safe place, like a Sticky Note on your computer. You will need it later.
🛑 WARNING: Do NOT share the “Secret Key.” That is for your eyes only!
Step 2: Create Your Wallet’s Address (create sub-domain)
We need to give your wallet a place to live. We are going to create a “Sub-domain.” This is like giving your wallet its own private office so it doesn’t get mixed up with your other files.
Log into your cPanel (this is your hosting control panel).
Find the section called Domains and click the icon that says Domains.
Click the blue button that says “Create A New Domain.”
In the first box, type:
wallet.yourdomain.com(Replaceyourdomain.comwith the name of the website you bought).🛑 STOP! LOOK AT THIS NEXT PART: There is a checkbox that says “Share document root.”
UNCHECK THAT BOX. If you leave it checked, you might accidentally break your main website.
Once you uncheck it, a new box appears. Delete whatever is in there and type:
magic-wallet-appClick Submit.
Step 3: Wake Up the “Engine” (Node.js)
Now we need to tell the server to turn on the “Engine” that runs your wallet.
Go back to your cPanel home and find the icon called “Setup Node.js App.”
Click “Create Application.”
Node.js Version: Pick the highest number you see (like 24.6.0).
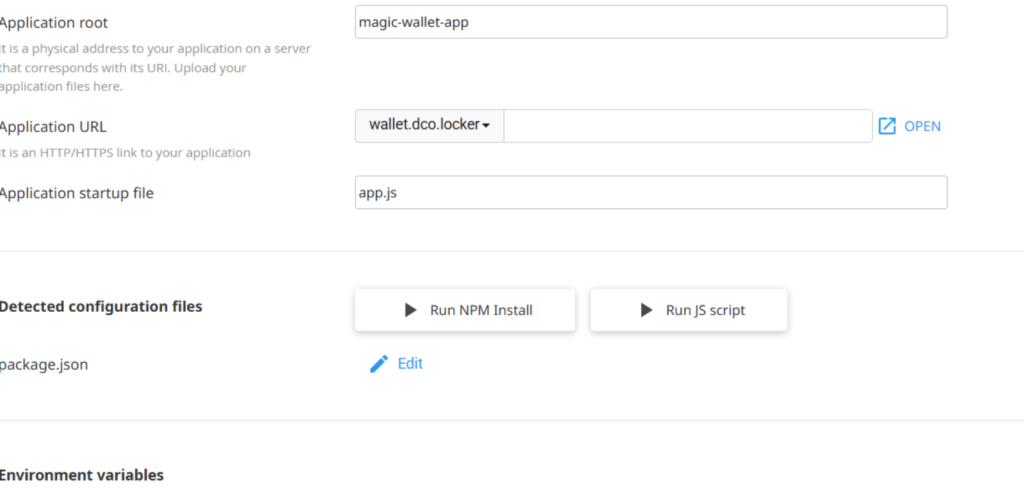
Application Root: Type
magic-wallet-app. (This MUST match the name we used in Step 2).Application URL: Pick your
wallet.address from the list.Application Startup File: Type
app.js. (Even though we haven’t made this file yet, we are telling the server to look for it later).Click the blue CREATE button at the top.
You should now see a Green Circle that says “Started.” Your engine is running!
Step 4: The “Brain” (Creating app.js)
We need to create the file that tells the server how to show your website to visitors.
In your File Manager (inside
magic-wallet-app), click + File at the top.Name it exactly:
app.jsRight-click the new
app.jsfile and choose Edit.Paste this code:
					const express = require('express');
const app = express();
const path = require('path');

// This tells the server your website files are in the "public" folder
app.use(express.static('public'));

app.get('/', (req, res) => {
    res.sendFile(path.join(__dirname, 'public', 'index.html'));
});

const port = process.env.PORT || 3000;
app.listen(port, () => {
    console.log(`Wallet server is running!`);
});
Click Save Changes and Close.
Step 5: The “Shopping List” (Updating package.json)
The engine is running, but it doesn’t have any tools yet. We need to give it a “Shopping List” so it can download the crypto parts it needs.
Go to cPanel File Manager.
Find the folder named
magic-wallet-appand double-click it.You will see a file called
package.json. Right-click it and choose Edit.Delete everything inside and paste this exact text:
					{
  "name": "my-wallet",
  "version": "1.0.0",
  "dependencies": {
    "magic-sdk": "^28.0.0",
    "express": "^4.18.2"
  }
}
Click Save Changes and Close.
The Final Step for the Tools: Go back to your Setup Node.js App screen. Scroll down and click the button that says “Run NPM Install.”
If a red box appears at the top, ignore it! As long as you see a “Success” message, you are good.
Step 6: The Final Step for the Tools: (Run NPM Install)
Step 7: The “Front Door” (The Wallet UI)
This is the part the user actually sees. We need to create a folder and put a webpage inside it.
Inside
magic-wallet-app, click + Folder and name itpublic.Double-click the new
publicfolder to go inside.Click + File and name it
index.html.Right-click
index.htmland choose Edit. Paste this code:
					<!DOCTYPE html>
<html>
<head>
    <title>Web3 Identity Wallet</title>
    <meta name="viewport" content="width=device-width, initial-scale=1" />
    <script src="https://auth.magic.link/sdk"></script>
    <style>
        body { font-family: sans-serif; display: flex; justify-content: center; padding: 50px; background: #f4f4f9; }
        .card { background: white; padding: 30px; border-radius: 20px; box-shadow: 0 10px 30px rgba(0,0,0,0.1); text-align: center; width: 350px; }
        button { width: 100%; padding: 15px; margin: 10px 0; border: none; border-radius: 10px; cursor: pointer; font-weight: bold; transition: 0.3s; }
        .btn-primary { background: #7B3FE4; color: white; }
        .btn-primary:hover { background: #6029c4; }
        .btn-black { background: #000; color: white; }
        .btn-primary:disabled { background: #ccc; cursor: not-allowed; }
    </style>
</head>
<body>
    <div class="card">
        <h2 style="color: #7B3FE4;">IDENTITY WALLET</h2>

        <div id="auth-section">
            <button id="login-btn" class="btn-primary" onclick="login()">LINK EMAIL / CREATE WALLET</button>
        </div>

        <div id="wallet-section" style="display:none;">
            <p style="color: green; font-weight: bold;">Wallet Active</p>
            <button class="btn-black" onclick="showDashboard()">OPEN WALLET DASHBOARD</button>
            <button style="background: none; color: #ff4d4d; margin-top: 20px;" onclick="logout()">Log Out</button>
        </div>
    </div>

    <script>
        /* 2. INITIALIZE MAGIC (Replace 'YOUR_PUBLISHABLE_KEY' with your actual key) */
        const magic = new Magic('YOUR_PUBLISHABLE_KEY', {
            network: {
                rpcUrl: 'https://polygon-rpc.com/', // Mainnet RPC
                chainId: 137 // Polygon Mainnet ID
            }
        });

        /* 3. SESSION CHECK: Runs automatically on page load */
        async function checkStatus() {
            try {
                const isLoggedIn = await magic.user.isLoggedIn();
                if (isLoggedIn) {
                    document.getElementById('auth-section').style.display = 'none';
                    document.getElementById('wallet-section').style.display = 'block';
                }
            } catch (err) {
                console.error("Session check failed:", err);
            }
        }
        checkStatus();

        /* 4. LOGIN FUNCTION */
        async function login() {
            const btn = document.getElementById('login-btn');
            btn.disabled = true;
            btn.innerText = "CONNECTING...";

            try {
                // Opens the Magic Email/Social Auth Modal
                await magic.wallet.connectWithUI();
                await checkStatus();
            } catch (err) {
                console.error("Login encountered an error:", err);
                alert("The login process was cancelled or failed. Please try again.");
            } finally {
                btn.disabled = false;
                btn.innerText = "LINK EMAIL / CREATE WALLET";
            }
        }

        /* 5. OPEN WALLET UI */
        async function showDashboard() {
            try {
                await magic.wallet.showUI();
            } catch (err) {
                console.error("Dashboard failed to load:", err);
            }
        }

        /* 6. LOGOUT FUNCTION */
        async function logout() {
            await magic.user.logout();
            window.location.reload();
        }
    </script>
</body>
</html>
Look for
YOUR_KEY_HEREnear the bottom. Delete those words and paste yourpk_livekey from Step 1 inside the quotes.Click Save Changes and Close.
Step 8: The Grand Opening (RESTART Node.js App)
Go back to the Setup Node.js App screen.
Click the big RESTART button.
Type your address (e.g.,
wallet.yourdomain.com) into your phone or computer browser.VICTORY! You should see your wallet card. Click the button, log in with your email, and see your dashboard!
This page is Amazing
🛠️ Deep-Dive Details (The “Why” and “How”)
The “Key Factory” (Step 1) Detail
The “Secret” vs “Public” Rule: Explain it like this: “Your Public Key (
pk_live) is like your home address; anyone can know it to send you mail. Your Secret Key (sk_live) is the actual key to your front door. If you put the Secret Key in your website code, you are leaving your front door wide open for hackers.”
The “Subdomain” (Step 2) Detail
Unchecking the Box: Most beginners miss this. If they leave “Share document root” checked, cPanel tries to put the wallet files inside their main
public_htmlfolder. This creates a “war” between the wallet and their main website. Unchecking it creates a separate ‘apartment’ for the wallet code.
The “NPM Install” (Step 4) Detail
What is NPM?: Tell them: “NPM stands for Node Package Manager. Think of it as an ‘App Store’ for your server. When you click ‘Run NPM Install,’ your server is literally downloading the professional tools used by the world’s biggest crypto companies.”
🆘 The “Don’t Panic” Troubleshooting Guide
If things didn’t go perfectly, find your symptom below.
1. Symptom: I see a big “Red Warning” after clicking Run NPM Install.
The Reality: 90% of the time, this is a False Alarm.
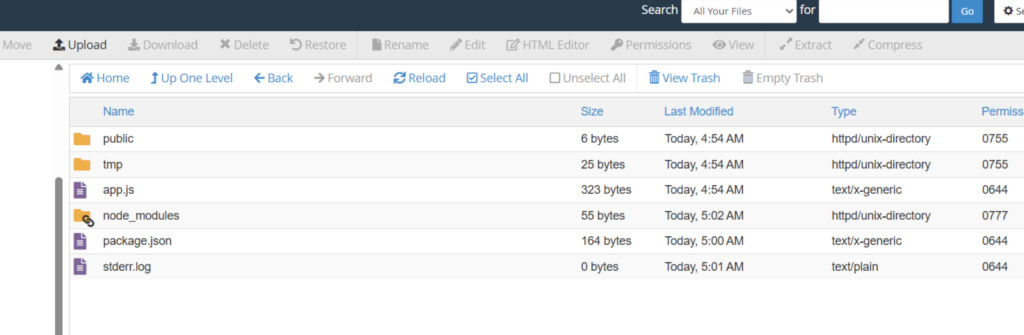
The Fix: Look at the very bottom of the screen. If you see a new folder in your File Manager called
node_modules, it worked! cPanel often shows a red error because it tried to “test” the site before the tools were fully finished downloading. Ignore the red, look for the folder.
2. Symptom: I visit my site and see “It works! Node.js version XX”
The Problem: You are seeing the “Placeholder” file that cPanel created.
The Fix:
Go to your File Manager.
Look for a file named
app.js(the one cPanel made, not yours).If there is a file named
index.jsordefault.js, delete them.Go back to your Node.js Setup and click RESTART. The server needs a “kick” to stop showing the old page.
3. Symptom: I click the button and nothing happens (or a “Link Expired” error).
The Problem: This is usually a security setting in your email.
The Fix:
If you are testing this yourself, don’t use an email scanner.
Make sure you are using a Fresh Browser Tab.
Check the Key: Ensure there are no extra spaces inside the quotes when you pasted your
pk_live_key. Even one tiny space will break the connection.
4. Symptom: I see a “404 Not Found” Error.
The Problem: The “Brain” (
app.js) can’t find the “Face” (index.html).The Fix:
Double-check your folders. Is your
index.htmlfile inside a folder namedpublic?If you named the folder
Public(with a capital P), it will fail. In the world of servers,publicandPublicare two completely different things. Everything must be lowercase.
{ 📸 Screenshot Tip for the Troubleshooting Guide }
The “Red Box” Image: Take a screenshot of the actual Red Error box and put a big green checkmark over it with the text: “THIS IS NORMAL! IGNORE ME!”
The “Folder Structure” Image: Show a “Tree View” of the files:
magic-wallet-app/app.jspackage.jsonpublic/<– (Highlight this folder)index.html
Does this level of troubleshooting feel like it covers the main “frustration points,” or should we add a section on how to check the “Error Logs” in cPanel?